Showing posts with label baking. Show all posts

Tuesday, September 08, 2020

Pumpkin Streusel Bread

Happy Fall! 
Yes, I know it isn't technically fall yet, but the as soon as Labor Day is over it's fall in my mind.  Fall means changing leaves, crisper weather, and the need for all the cozy comfort food and treats. One of my favorite fall treats is pumpkin bread. I've been making this version since 2014, when a friend gave me a loaf of apple bread with streusel, and I thought it would be perfect on my pumpkin bread. Spoiler alert, it is amazing.

Pumpkin Bread Batter
1 can pumpkin puree (not pie, the regular 15 oz size pumpkin puree)
3 eggs
1/2 cup butter
1 tsp vanilla extract (I use the vanilla bean paste)
1 cup sugar
1 3/4 flour (I do 1 1/4 reg & 1/2 whole wheat)
1 tsp baking soda
1 tsp baking powder
1/2 tsp salt
1 1/2 tsp pumpkin pie spice
1/3 cup milk
optional chocolate chips - I usually do 1/2 plain & 1 cup of chocolate chips in the remaining batter.
Mix the pumpkin, eggs, butter, vanilla & sugar until smooth. Then add the rest of the ingredients and mix until smooth. Preheat oven to 350.
 
Once smooth pour into pans - makes 1 2lb loaf & 1 mini loaf, 2 1lb loaves, or 4 mini loaves. 
Once you've poured into the desired pans, make your streusel topping.
Streusel Topping
6 TBS butter
2/3 cups rolled oats
1/2 cup flour (I use whole wheat)
1/2 cup brown sugar
1/2 tsp cinnamon

Hand cut together to make a crumble, or toss it in your mixer or food processor -it's such a small amount I hand cut/mixed it. 
Press the streusel onto your bread batter. I really pat it on so less will fall off as it rises in the oven. 
Bake at 350 for about 45 minutes for full loaves, 30 minutes for mini loaves or 20 minutes for muffins. Since all ovens cook differently I would check at 35 and 20 minutes on loaves. Once your tooth pick pulls clean you're ready to pull. Let cool about 20 minutes before popping from the pan.

Enjoy!

Quick Baking Time Guide - 350 degrees
for full loaf cook for 45 minutes
for mini loaves cook for 30 minutes
for muffins cook for 20 minutes

Thursday, December 22, 2011

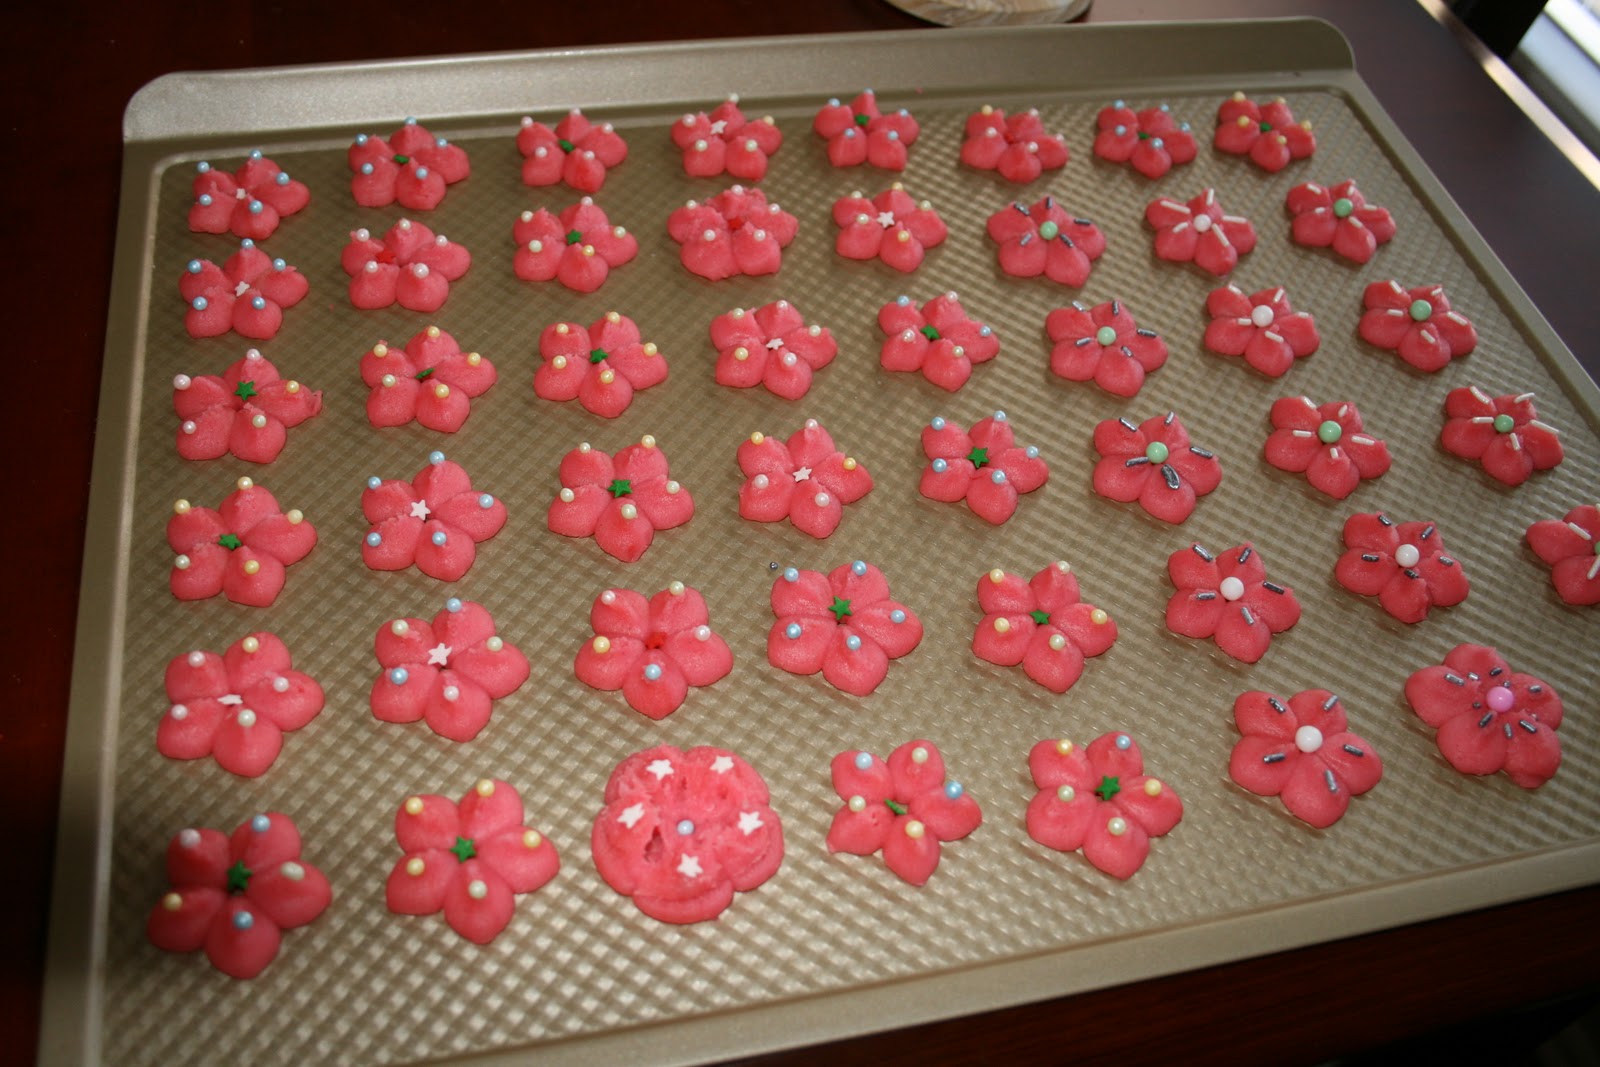
Spritz Cookies

Time for a Holiday Classic - Spritz Cookies. Spritz cookies are your classic cookie press cookie. I love a good Spritz Cookie, the soft, buttery vanilla crunch. I love them! Plain or decked out to the nines, Spritz Cookies are simple delicious and fun to make. From picking out which shapes and colors to whether to deck them out with colored sugar, sprinkles, nonpareils or leaving them as is, these cookies are just fun! On with the cookies!


The Deets
1 Cup Butter (2 Sticks)
1 1/4 Cup Sugar
1 Egg
1 1/2 tsp Pure Vanilla Extract
1 tsp Pure Almond Extract
2 1/2 Cups Sifted Flour
1/2 tsp Salt
Food Coloring
Sprinkles for Decorating
The How To
Whip Butter, Sugar, Egg, Vanilla and Almond Extract
Add Flour and Salt and Mix until Smooth
Divide Dough into as many colors you wish
Add Food Coloring until you get your desired color
Roll the dough into a roll that will fit into the cookie press
Pick your shape disc & press away (follow the instructions on your cookie press - mine is a Kuhn Rikon and it takes about 1 &1/2 trigger pulls for the perfect cookie)
Once cookies are pressed decorate away!
Bake at 375 for 7-8 Minutes.


Enjoy your perfect crispy spritz cookies & have a very Merry Christmas from my kitchen to yours!

Thursday, December 15, 2011

100th Post! I'm Never Making These Cookies Again Cookies a.k.a. Cream Wafer Cookies a.k.a. Dream Wafer Cookies

Before I share one of my favorite cookie recipes I want to recognize that this is the 100th Post! It only took 5 years but here we are at 100 posts! I can't think of a better recipe for the 100th Post! It's one of my favorite recipes, its a bit challenging but worth every frustration.
My love of cooking and baking started before I can even remember. One of the things I loved was making cookies with my dad and even better the grand bake-off for Christmas with my mom. It seemed that "we" would spend a whole weekend baking all sorts of great treats. Once I was older I started trying recipes on my own.
My first nemesis in the kitchen were the Cream Wafer Cookies from the old Orange Betty Crocker Cookbook - I renamed them {in ink, in my mother's cookbook} "I'm never making these cookies again cookies". I have fought with this recipe since I was 12 years old. Finally, Finally after all these years (well, not THAT many years) I made a perfect batch! Not a single broken cookie in sight. So here it is, my improved and perfect version of the cream wafer cookie.
The Deets on the Cookie
1 Cup Soft Butter (Not Melted just soft to the touch)
1/3 Cup Whipping Cream
1 tsp Vanilla Bean Paste or Pure Vanilla Extract
2 1/4 Cup Sifted Flour
Sugar for Dipping
The Cookie How To
Whip Butter, Whipping Cream, and Vanilla
Slowly add Flour
The dough will be quite sticky, but that's how it's supposed to be
Sprinkle Flour and Sugar on rolling space (I like to use the counter - liberally use flour & sugar - dough is sticky)
Roll Dough to approximately 1/6 inch thin
Cut into little circles (I've tried other shapes, but it's harder to match the pieces perfectly)
Carefully move cookies - the dough is soft so use extra caution when moving
Dip both cookies in Sugar - evenly coat both sides
*Put on Silpat or parchment paper - I did one batch straight on my gold touch & it worked like a charm - but I still recommend you use a Silpat*
Use a Fork to poke holes in cookies
Bake at 365 degrees for 8 minutes
Let cookies cool prior to filling


The Deets on the Cream Filling
1/2 Cup Soft Butter (1 Stick)
1 1/2 Cups Powdered Sugar
1 1/2 tsp Whipping Cream
1 1/2 tsp Vanilla Bean Paste or Pure Vanilla Extract
Food Coloring to desired color


The Filling How To
Whip all ingredients to a Fluffy Cream
Once cookies are cooled, add a nice heap about 1 - 1/2 TBS of Filling
Top with a second cookie
Enjoy your perfect cream wafer cookies

Saturday, December 10, 2011

Mint Meltaway Cookies - 2 Ways

Merry Christmas Season! Let the Holiday Baking Begin! Today's Christmas Cookie Delight is a new recipe I tried based on a recipe I saw on pintrest {did I mention I love pintrest?}. The original recipe is found here. As you know, or should know by now, I have a hard time leaving things alone... this recipe was no different. Here's my take on Mint Meltaway Cookies
The Deets
1 Cup Butter (2 sticks)
1 1/4 Cup Powdered Sugar
3 tsp Pure Mint Extract or Oil
3 tsp Pure Vanilla Extract
2 1/2 Cups Flour
Food Coloring
Hershey's Kisses (Plain or Mint Truffle)
Powdered Sugar


The How To
Preheat Oven to 375
Cream Butter, Sugar, Mint and Vanilla
Add Flour and Food Coloring
Mix Until Smooth


Option 1
Roll Dough into small balls and place on cookie sheet
Dust with Powdered Sugar once they come out of the oven

Option 2
Roll Dough into small balls and push a Kiss into the Center
Either way Bake at 375 for 8-10 minutes
My favorites are the ones with the Mint Truffle Kisses!
Enjoy your minty deliciousness!

Sunday, October 23, 2011

Fall into Fall: Chocolate Chip Pumpkin Cookies

Fall = Pumpkin. I'm a big fan of pumpkin in the fall, pumpkin cookies, pumpkin bread, pumpkin muffins, pumpkin seeds. There are only two ways (I know of) that I don't like pumpkin: pumpkin pie (I know, I know, it's a classic - but I can't do it - in fact, I don't like pie at all) and pumpkin soup (sorry mom). Anyway back to the good pumpkin! Today we are whipping up some pumpkin chocolate chip cookies! This recipe is quick easy and yields about 5 dozen fluffy pumpkin chocolate chip cookies. Yummy.


The Deets
1 Cup Butter (2 sticks) 
1/2 Cup Sugar
1/2 Cup Brown Sugar
2 Eggs
1 Can Pumpkin Puree
1 tsp Pure Vanilla Extract
3 Cups Flour (I use 2 Cups Regular, 1 Cup Wheat)
2 tsp Baking Soda
1 tsp Salt
1 tsp Cinnamon 
1 tsp Nutmeg 
1 Bag Chocolate Chips (Milk)


The How To
Cream Butter, Sugars and Eggs
Add Vanilla and Pumpkin
Add Flour, Baking Soda, Salt, Cinnamon and Nutmeg
Beat until Smooth
Add Chocolate Chips
Scoop onto cookie sheets (spray sheets with Pam first)
Bake at 350 degrees for 10 - 15 minutes (may take 20 minutes depending on oven)
Enjoy a cookie or two along with your beautiful fall weather!

Wednesday, August 10, 2011

The BEST Blueberry Muffins Ever

I Love Muffins. I Love Blueberries. So I'd say it's time to share a little Blueberry Muffin Recipe. The original Recipe came from my sister who got it here. Though I do Love the original version, here is my healthier take on Blueberry Muffins. Trust me my version is better - both tastier & healthier. Now Time for a little Muffin Magic!


The Deets
4 Eggs
1 1/2 Cup Sugar
2/3 Cup Canola Oil
1 tsp Pure Vanilla Extract
2 Cups LowFat Plain Yogurt or LowFat Sour Cream
2 1/2 Cups All Purpose Flour
1 1/2 Cups Whole Wheat Flour
1 tsp Baking Soda
1 tsp Salt
2 Cups Blueberries
*Raw Sugar for topping


The How To
PreHeat Oven to 385 degrees
Whip Eggs
Add Sugar and beat until smooth
Add other Wet ingredients and beat until smooth
Gradually Add Dry ingredients
Add Blueberries
Scoop into Muffin Pans
Sprinkle Raw Sugar on Top
Bake for 20 minutes or until golden brown

Plate, Pray & Enjoy!

Monday, April 18, 2011

Pop! Pop! Popovers!

I Love Popovers. 
     Popovers are a light, fluffy, eggy delicious roll. If you've heard of popovers, you've probably heard the horror stories of popovers that refuse to "pop", that are thick, dense and refuse rise. I have not had that experience, but I "know this one lady that had that happen to her and it was just tragic". Anyway, back to the popovers at hand if you follow the instructions your popovers should pop just fine.
     Now, before we begin, you do NOT need a popover-pan, a cupcake pan will do the trick - in fact, I've been eating popovers my whole life and didn't even know there was such a thing until a few months ago. So, save your money for a really cool kitchen toy you actually "need".
Ok. Good. Now Let's Get Popping!

The Deets for 1 Dozen
1 1/2 Cups of Milk (I use skim)
3 Eggs
1 1/2 Cups Flour (I did 1 Cup all-purpose and 1/2 Cup Whole Wheat)
1 tsp Salt

Add Ins
Cheese!!! Use about 1/2 Cup of shredded cheese
The ones shown have Gruyere.
Cheddar or Swiss are also great.

The How To
***Follow the little steps to insure perfect popping popovers***
Heat Milk until it just starts to bubble then remove from heat
Whisk Eggs in a separate bowl until they are a frothy "mellow" yellow
Gradually whisk in Milk, slowly so that you don't scramble the eggs.
Sift in 1/2 of the flour (must be sifted) whisk until smooth
Add Salt and remaining flour
Whisk until Smooth
Preheat Oven to 400 degrees.
Place cupcake pan {or if you're one of those people, your popover pan} in oven to warm it up - about 5 minutes - remove pan from oven and spray with cooking spray
Fill cups 3/4 full
If you want to add cheese, sprinkle desired amount on top
Place in Oven *Do Not Open Oven Once you begin cooking the popovers*
Bake for 30 - 35 minutes or until Golden Brown & "Popped"
Pop popovers out of the pan and serve.
Plate, Pray & Enjoy!

Wednesday, December 15, 2010

Banana Bread

Banana Bread is one of those perfect treats on a cold day.  


It's sweet, it's bread and it has fruit in it, so you don't have to feel bad about eating it, even if it is loaded with chocolate. Plus you can add flax or nuts for a little more of a health kick.
I started experimenting with banana bread recipes back in college, my friends enjoyed countless trial runs of various recipes, even after I came up with "the one".  But no matter how many things I add, take away or mess with the ratios,  this is the best one I've come up with, I always come back to it.  I think it's perfect.  Let me know what you think.


The Deets
3/4 Cup Sugar
1/2 Cup Butter
2 Eggs
1 tsp Vanilla Extract
1/3 Cup Milk
4 - 5 Bananas (I prefer to freeze mine & then thaw them out when it's baking time)
1 Cup Unbleached Flour
1 Cup Whole Wheat Flour
1 tsp Baking Soda
1/2 tsp Salt
1 Cup Chocolate Chips
1/4 Cup Flax Seeds


Instructions
Mix Wet Ingredients 
Add Bananas & Mix Well
Add Flour, Backing Soda & Salt
Add ChocoChips & Flax Seeds
Heat Oven to 350 Degrees


I'm a big fan of the mini loaves.  
This recipe will make 4 minis or one normal loaf of Banana Bread
For the minis bake @ 350 for 35 minutes
For the normal loaf bake @350 for 50 - 55 minutes or until toothpick pulls out clean.


Enjoy!

Friday, August 20, 2010

Cookies Part I

Some Days you just need cookies. 
Today was one of those days.

I Love Chocolate Chip Cookies! 

Of all the desserts in the world, a perfect cookie is my favorite.

I'm pretty sure it is because I have such great memories of making chocolate chip cookies with my Dad when I was little.  My Dad makes THE BEST Chocolate Chip Cookies.  
His secret? Maraschino cherries & lots of love. 

My sis sneaking some cookie dough circa 2006?


Memory plays a big role in food choices. There are foods we love or hate based on past experiences (See my very first post for more details). Making cookies with dad was always fun. No matter how many little hands were trying to help, he always made you feel like your job was the most important part.  He never got frustrated and he never worries about the mess we made. And the best part?  He always let us eat as much cookie dough as we wanted! Oh & he did the dishes!

I don't make Dad's cookies very often, because it's a pretty sticky process & I tend to like to experiment with making my treats a little healthier.  Plus it's just more fun to make them back home with Dad. 

Tonight I used the following recipe:

1 1/4 cup mixed flour (1/2 whole wheat, 1/2 unbleached flour)
1 cup oat flour (1 cup oatmeal blended in the blender)
1/2 cup oatmeal
1 tsp baking soda
1 tsp salt
1 cup butter (2 sticks)
3/4 cup sugar
3/4 cup brown sugar
1 tsp real vanilla extract
2 free range eggs
1 bag chocolate chips (Ghirardelli to be exact)

Bake at 375 degrees for 9-11 minutes

The Set up

I Love Love Love my Kitchenaid Mixer. My parents bought it for me 5 years ago when I bought my first place. One of the best gifts ever.  Also note the awesome collapsible measuring cups by Chef n. As you will note I have a thing for Kitchen tools. There is at least one kitchen tool on my wish list for every holiday.  My latest acquisition is a set of Williams Sonoma Gold nonstick insulated cookie sheets (I also got a set of matching muffin pans because my husband rocks!) Let me tell you, these cookie sheets are amazing! They really do not stick.  Your cookies slide right off, pure perfection. 


Baking away

So this was my first attempt at "Low Elevation Baking". I've always been a high elevation girl, I learned to bake nestled in the Rocky Mountains, I've been doing it for so long, that I forgot there was a difference when you change elevation. Well. Let me tell you. There is a difference.

The Proof

The cookies jumped off the pan so fast (courtesy of husband) I couldn't get a shot of the whole sheet. 
But these 4 little guys just couldn't bear to part.
Although they weren't aesthetically pleasing, they were delicious!
A few more batches & I'll have them back to perfection.
Happy Baking!